Showing posts with label crafting. Show all posts

Sunday, December 4, 2016

The Negativity Monster

Talk about a surprise!  My old boss contacted me recently with a completely unexpected and awesome creative opportunity. 

Ready for this?  She offered to hire me to create an altered book display for the library to promote the library association and the upcoming altered book art show.
 

Wait...what, now?  That was pretty much my reaction!  All I can say is that I was extremely flattered that she thought of me.

I've created my share of altered books over the years - you can check out a few of them here and here if you're so inclined.  Crafting altered books was always just for fun, so the fact that someone wanted to pay me for something that had been a hobby in the past?  Well, elated about covers it!

Along with feeling both flattered and enthusiastic, I was also freaking out a little bit.  Because of course, the negativity monster popped up on my shoulder to add his horrible and unwelcome two cents.

You know the negativity monster.  We all do.  Mine is an ugly, pointy eared, little shit that asks patronizing questions like, "Who do you think you are?  You're no professional artist, why would you ever agree to take this on?" And, "You know you're not artistically talented enough to make something that doesn't look like a 3rd grader did it, right?"

I told you - he's a shit.  Not to worry.  I told him to shut the hell up and I accepted the offer.   And I'm so glad that I didn't give in to doubt and fear!

Once I agreed, it was time to ratchet up the creative confidence and know that I could pull it off.  What fun it was, too!

The idea behind the project was to promote the Kodiak Public Library Association, emphasize that a membership to KPLA is an excellent holiday gift, and also to promote the upcoming altered book art show that the Kodiak Public Library Association and Kodiak Arts Council puts on every year.

Again...fun!  I started by viewing a few youtube tutorials on paper tree folding, as well as several step-by-step how to articles on carving books, etc. This was what I used to make the trees, and it was super straight forward and easy to follow.

There was quite a bit of paper folding & cutting to craft Sitka Spruce tree look alikes, since that tree is predominant on Kodiak and was part of the request.

It was basically lots of this:


Once I refined the technique, I made about a half a dozen trees to make a little forest of various sized "Spruce" trees.  They turned out cute!


After I made all the trees, I used an X-ACTO knife to cut out a rectangular shaped dropped space inside the main body of a hard cover book, using this step-by-step tutorial.  The pages are sealed with Mod Podge, so the whole bottom half of the book is secured to the back cover.


I covered the pages with colored and patterned scrapbook-type paper to pretty-up the tattered and glue covered pages so the finished project looked a little sleeker and more polished.

The last step was to come up with a way to promote a KPLA membership as a holiday gift.  Initially, I wanted to stencil on the opposite page, but I quickly realized that stenciling with paint was more challenging than I anticipated.  It was coming out messy looking, and I totally effed it up not even halfway through.  Case in point.


As you can see, I misaligned the M and the E and then promptly FUBAR-ed the last E.  Not to mention it looked sloppy.  So, I scrapped my grand plans to stencil, since it was my first time attempting it, and frankly I sucked at it!

I went in a different direction, and I think it's worlds better than my feeble attempt at stenciling.


Once I put it altogether, I was pretty happy with the final product.


Now all that's left is to ship it to Kodiak.  It's still a little surreal to me that this was work.  This?  How could this possibly be work?  It was nothing but fun, creative time for me, so I can't feel anything but gratitude that the opportunity came my way!

The author Seth Godin said it well:  "If it scares you, it might be a good thing to try."

So there's only one thing left to say.  Screw the negativity monster. Always say yes! 

Ta-ta for now.


Wednesday, October 19, 2016

Halloween Wreath

Full disclosure - this one was a teensy bit tedious.  It took me weeks to make all the pom-poms that make up the bulk of this wreath.  Mostly because lazy.

My grand plan is to make the accessories exchangeable, so I can flip it from Halloween to a Thanksgiving or harvest theme.  The orange color pallet makes for a nice autumnal blank slate to play with, and I think it looks nice just on its own, without adding any accessories. 

Supplies are pretty simple:  a straw wreath form, two different tones of orange yarn, floral pins, and scissors.  I used two packages of the light orange yarn, and 1 for the darker orange. 

The pom-pom tutorial I followed can be found here.  Super easy, by one of my favorite crafty gals, Miss Mustard Seed.

I interspersed the darker orange yarn amongst the pumpkin colored yarn, which I chose as the primary color.


Once you've made the pom poms, it's just a matter of attaching them to the wreath using the floral pins.

I hung  a few Halloween-themed whimsical guys I've had for a while inside the wreath, and on the bottom.  I got them at Pier One years ago, and I just love them.  I break them out every Halloween.  They make me happy.


Here's the full wreath in all its fluffy glory:


I think in a few weeks, I'll either replace the less than menacing monsters with pine cones or just leave it plain, so it's not Halloween specific, but just autumnal.  It's a multi-functional wreath.  Happy fall, y'all!

Ta-ta for now.


Sunday, January 10, 2016

Procraftination

I'm blaming the holidays for my rampant lack of blogging as of late.  It's really a 50/50 combo of "I've been holiday busy" and "I don't have anything to report."  Well, besides my New Year's Day Polar Plunge nonsense.

But, enough of the excuses.  I decided it was time to kick myself in the butt and get back into a regular blogging routine.  And also try to self-motivate.  Because frankly, I've been a crafting deadbeat.

I can name about seven projects right off the top of my head that I started at some point in the past year or, um four, and just didn't get around to finishing.  It's a sad state of affairs in my crafting world.

So, it leads me to the inevitable.  I'm not a big new years resolution kind of gal, but I think this year might be the time to make a resolution.  I've forced my own hand with my flagrant crafting procrastination.  Procraftination?  These random started and never finished projects need to get the eff done already.

So I'll call it a win here:  I've posted something new on the old blog, and I'm putting a little fire under my ass about ending my procraftination.   Do you like that portmanteau as much as I do?  Probably not!

Here's to a new year...and less creative dilly-dallying.  Wow.  I just channeled my 6th grade teacher with that turn of phrase!  Short but sweet & picture-free post this week. It's all I could manage. 

Happy New Year!

Ta-ta for now.


Friday, December 18, 2015

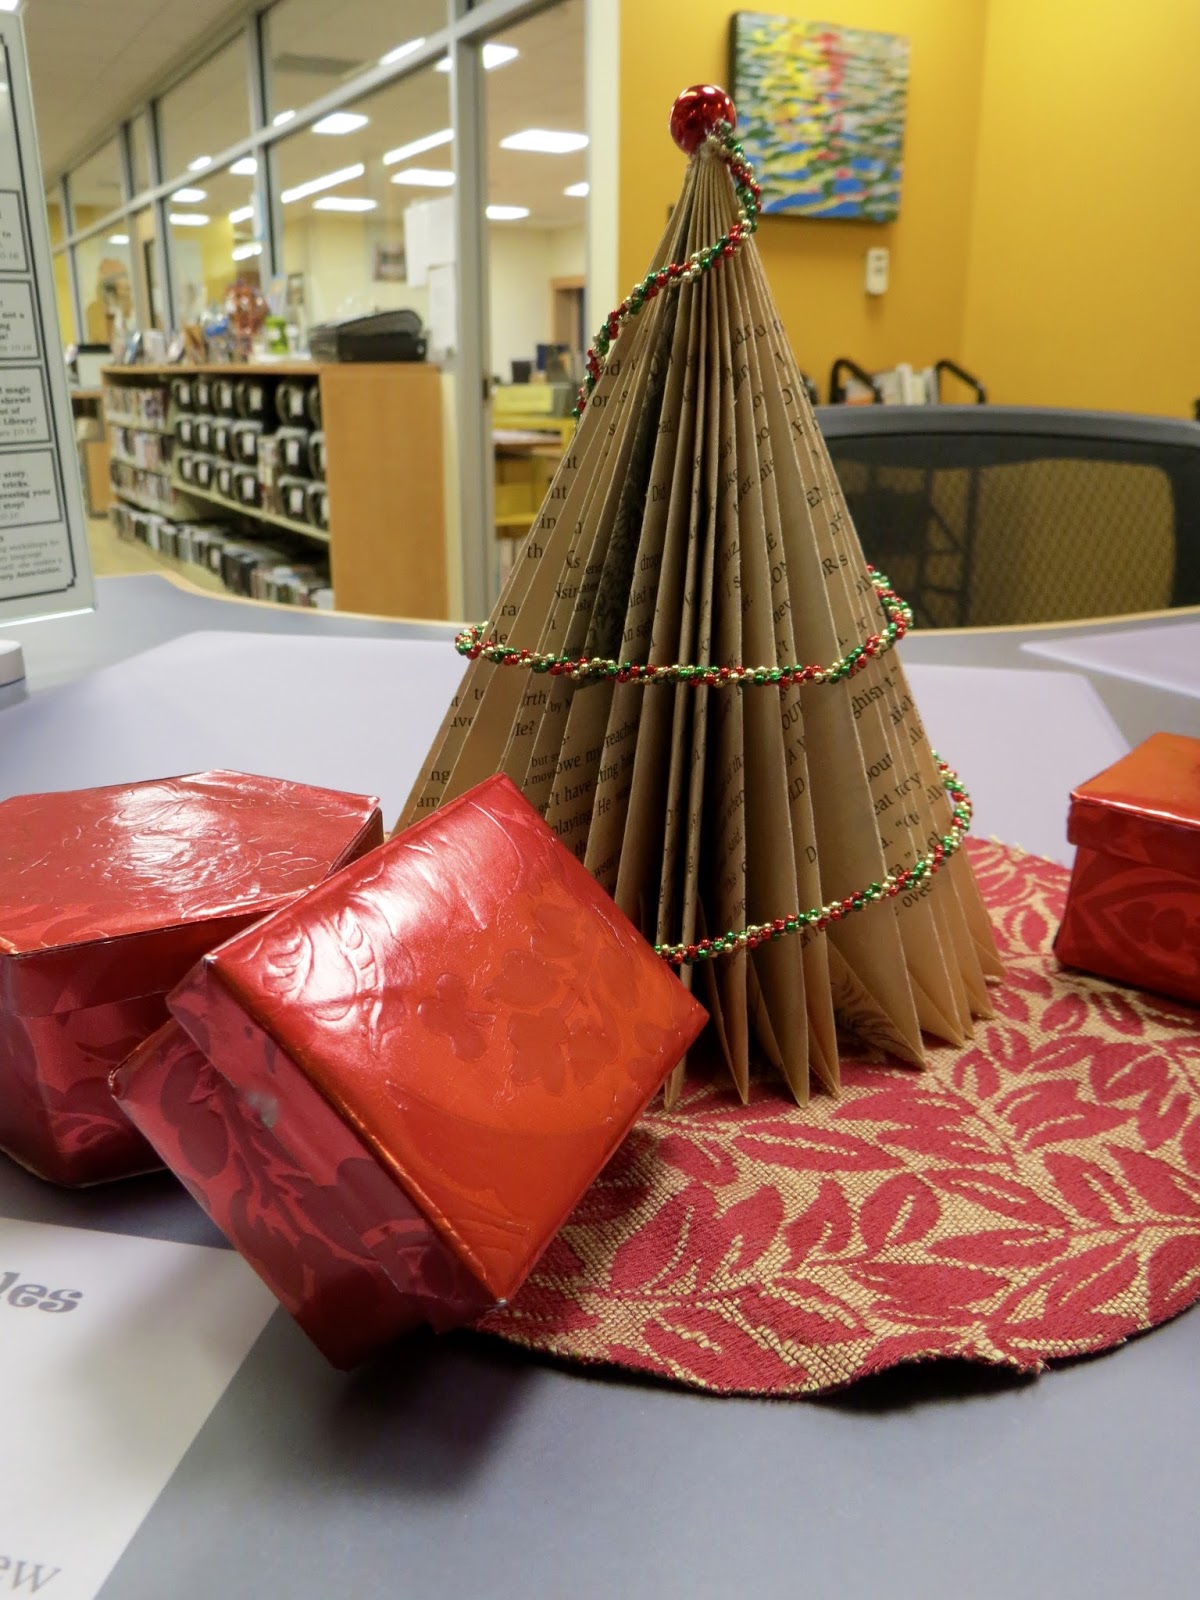
Altered Book Christmas Trees

Who's ready to get their Christmas book craft on?  Now here's when you pipe in with, "I do, I do!"

This is an easy tutorial, and the end result is so cute.  I set up a display on the front desk of the library where I work with the finished trees and it looks adorable.  Bookish and festive!

I'll go through the step by step of what I did, which was based on the instructions I found here.

It's one of those projects you can work on while you're watching t.v. - You fall in to the repetition of folding the pages and before you know it, you're finished.

You'll need a few old books that you don't mind re purposing, an exacto knife, dry adhesive, and any accessories you'd like to use to decorate the trees.   I like to use books that are older and have yellowing pages because of the antique-y effect it gives to the finished tree.

Here are the steps:

Step 1
Remove the front and back covers from the book

Step 2
Count out 30 pages, and carefully slice down the binding to separate the pages from the rest of the book


Step 3
Count out another 30 pages, and slice down the binding again. 

Step 4
With the binding an the left, fold down the top right side of the page into a triangle


Step 5
Fold the page down toward the binding a second time, sort of like you're making a paper airplane


Did I mention I used a very old children's book for my trees?  Nice werewolf picture, right?

Step 6
Fold the little triangle at the bottom of the page up.


Continue folding all of the pages in this way until you've folded all of them, and you have half of a tree.


Once you've folded all of the pages in both 30 page sets, thoroughly coat the back of one of the tree halves with dry adhesive, and affix the two tree halves together.

I decorated the tree with crafting supplies I had on hand, and my final result looked like this:


Like I said earlier, I set up a cute little display for the Christmas season on the front desk at the library where I work, and I think it's too damn cute:


How fun for folks to walk in the front door and have these festive altered books greet them.


Merry Christmas, and happy book crafting if you give this one a go!

Ta-ta for now.


Monday, October 12, 2015

Classic Monster Pumpkins

I decided not to do any pumpkin carving for Halloween this year.  Instead I tackled painted pumpkins.  I went with classic monster characters for this year:  Dracula, Frankenstein, a mummy and a vampire bat.  What fun this was!

Certain parts turned out to be a little more challenging than I expected, and I wasn't really crazy about how some of the eyes turned out.  Eyes are hard! 

I used paint, felt, crafting foam, and hot glue.  I don't have much of a step-by-step for these because I just used pictures I found online for inspiration.  The rest I sort of free-styled.

I think I like the carved pumpkins I've done over the last few years better than my painted project for this year.  But out of the four from this year, my favorite is the mini-bat pumpkin.


Just too damn cute.  The hubby thinks it looks like Toothless from the movie How to Train Your Dragon.  I can see it!  So, along with the bat, as I mentioned already, I painted a Dracula...


And a mummy...


And a Frankenstein...

Those eyes!  They make him look a little...special.

My favorite part of Frankenstein is the bolts in the side of his "neck."  In this case we're working under the assumption that pumpkins do in fact have necks.  I can't help making the MREEEEEHH Frankenstein moan in my head whenever I look at him.

So, here are all of my monster pumpkins out on our table in the front.


These were fun to do, but like I said earlier, I think I'll go back to carving next year.  They're cute, but I think last year's zombies and the year before's vampires came out better.  19 more days till Halloween!

Ta-ta for now.


Saturday, September 5, 2015

DIY Harvest Wreath

Oh, it's that time of year again alright.  Harvest time!  I seem to do way more crafting in the fall and winter, and this harvest wreath is my first project of the season this year.  Between Halloween, Thanksgiving and Christmas I definitely tap into the craftiness much more often once fall hits.

I guess it's the holidays & crispy weather.  Or perhaps it's because it coincides nicely with Alaska hibernation season.  Definitely one of the two. Because really - what better way to wile away the winter dark & cold than with crafts.  And booze.  But once again, I digress.

I've wanted to create a burlap wreath like this one for a long time, so I'm glad I finally got off my ass and did it.  It wasn't hard, thanks to you tube.  I followed this woman's tutorial for the burlap part, and free styled the decorating part.

I had a bunch of fall-themed decorations on hand already, and I found the orange thistle flowers I used on one of my favorite craft sites, www.save-on-crafts.com.  It's hard to believe how affordable their stuff is - well, minus the outrageous Alaska shipping costs, anyway.  Check it out, you'll be surprised at the variety and price.

I started with a standard Styrofoam wreath form, wrapped it with burlap & secured it with hot glue so the white wouldn't peak through.


Next, I cut the burlap into 5 x 5 squares, and glued each piece into little "pillows."  You basically just fold the pieces into triangles and glue the corners together to make little poufs.

There were more than a few sessions of picking the hot glue off of my fingers.  And I may or may not have burned my thumb a few times.  I never said I was precise. 

The finished poufs are on the bottom right

The fun part is arranging the poufs onto the wreath.  I squished them together and secured them with hot glue and pins, rearranging and jujing as I went.


Coming along

The part I struggled with was the design and spacing of the harvesty things I used on the wreath.  You can use whatever floats your boat, decorations-wise.  I was set on the harvest-theme, but you could easily go in a totally different direction.  Flowers, berries, something holiday specific...whatever you want. The burlap is pretty much a blank canvas.

I used mini-pine cones, acorns, wheat, orange thistle flowers & some brown nut/flower type carved pieces.  I still question whether my spacing, amounts, and positioning works, and I was especially unsure about the spikes of wheat sticking out, but overall I think it looks good.


I have to use this close-up picture of the flowers because the hubby thinks he's hilarious.


After I had a few days to check it out on the door as I was coming and going, I decided I love it!  Not too bad for my first autumn burlap wreath!

Now...what to tackle next at the start of hibernation/crafting season?  New harvesty cocktails or something crafty?  What the hell, who says I can't do both?  But maybe not together.  Could be messy.  Ha.  Gotta make the best of the winter suck, so standby for...stuff.

Ta-ta for now.


Wednesday, July 22, 2015

DIY Jewelry Board

Every last one of us has those - we'll just call them quirks - within our personalities that we're not exactly screaming from the rooftops about having.  Are ya with me on that one? 

You know the ones.  Those less than positive traits that your friends/family/significant other probably cringe over.  Or maybe even outright harass you about.  Like habitually running late, unintentionally talking with your mouth full, or interrupting others when they're talking.  (I'm guilty of that last one.) 

One of those - ahem...quirks that I'm in a constant battle with is the P word. 

Procrastination. 

It's bad.  I will always, always, always put off tasks until tomorrow.  Or later.  Or some other time.  It's a wee bit of a problem.

Which is why I'm so happy to finally be able to share this project.  Because talk about procrastinating.  We're talking years!  This project has been on my DIY/crafting radar for about 4 years.  Maybe more.  And it wasn't even a difficult task!  Who knows why it took me so long.  Procrastination at its peak.

So I'm thrilled that I finally finished it!  Some of you I'm sure have seen them before, and some of you have even made your own - it's a DIY jewelry board.  I love how it turned out!

Supplies for this project were mostly what I already had & re-purposed:  a cork board, fabric, craft paint, and hooks. I started with this:


The pinhooks were a great find. - They're basically thumb tacks with a hook on the end.  They were just what I was looking for.

I painted the bulletin board frame with white craft paint, and cut out the amount of cloth I would need for the space on the board.  Truth be told, I hadn't done any sewing in a while, so the final seams on the fabric turned out to be a bit of a shit show.  Crooked, uneven, you name it.  But, it was done!

After the painting and sewing, I used a little bit of basting spray to secure the fabric to the cork board, and sort of shoved the edges under the frame border.  Came out okay.  Not perfect, and most definitely an amateur job, but I still love it:


Of course, I ran out of pinhooks and couldn't fit the rest of my rings, so I'll need to order another box of hooks.  Perhaps some would say I don't need more hooks, but less jewelry.  Nonsense.  Variety is the spice of life, right? 


I love that I can see everything all at one time now. - And I'm wearing pieces that have been hidden & stuffed in the back of a jewelry box for years.  Earrings and necklaces I forgot I even had.

Procrastination be damned, I'm calling this project a win.  Crooked seams and all. 

Ta-ta for now.


Monday, March 16, 2015

DIY Pillow & Linen Spray

Marjoram
Photo credit: Forest & Kim Starr, via Wikimedia Commons
Pillow spray?  Hell yes!  I'm fully in love with it.  I jumped on the essential oils band wagon not too long ago, and pillow/linen spray is one of my favorite do-it-yourself ways to use them.

I don't know how I went so long without it!  It freshens up your bedding and adds such a subtle, lovely scent to your sheets and pillows.  I started with using scents that are relaxing and conducive to rest and sleep.  So that meant oils like marjoram, bergamot, & lavendar.  Not all together, of course.

I mixed one version with marjoram and bergamot and one version with just lavendar.  I haven't decided which one I like better, but I love the bright, calming addition the scent adds to the bedding.

It's great to spritz on the throw pillows and couch, too.  Nobody wants their throw pillows to smell like head, right? 

There are lots of different combinations you could use that are meant to encourage sleep. - Along with marjoram, bergamot and lavender, there's sage, chamomile, sandalwood, and tons of others.  There are all sorts of online resources you can consult to formulate your own blends for pillow/linen spray.  It's really whatever floats your boat. The recipe is really easy.  All you'll need is:
  • 4 oz glass spray bottle (I used this one)
  • 1 oz vodka
  • 20-25 drops of preferred essential oils
  • Distilled water to fill the rest of the bottle
The vodka helps the scent to linger a little longer and not dissipate, but you can also use witch hazel for the same effect.


It's funny, the first batch of pillow spray I made, I used what we had on hand. - Which happened to be a pricier brand of vodka we had in the freezer.  The hubby was all, "What are you Jay-Z?  Spraying the bed with freaking Ketel One."

It was only for the first batch!  I got mini-cheapie vodkas from the exchange after that first batch, but that didn't stop him from using every opportunity he could to call me Beyoncé or Jay-Z.

Of course, I had to get a little crafty with my spray bottle, so I made a label and printed it on a pattern of scrapbook paper I liked.

I love exploring new fonts, so I found one I liked - probably from www.dafont.com - one of my favorite fun, free font sites.  I adhered the paper to the bottle with mod podge and then coated the outside to seal it.  Makes a cheerful little label for the pillow spray, dontchya think?

I know you feel like channeling your inner flower child now.  Come on, you know we all have one!

Give a little DIY essential oil pillow spray a whirl.  It'll crank up the atmosphere in your bedroom and maybe even help you sleep better!

Ta-ta for now.


Monday, March 2, 2015

St. Patrick's Day Wreath

I'm hoping my St. Patrick's Day wreath survives Kodiak's "spring" weather this year.  Because last year's wreath?  It didn't do very well.  I kept it simple this year, but still a fun and festive decoration for the door on these seemingly unending rainy, gray days.  The dreariness is seriously heavy.  And as I might have mentioned before, it's freaking OLD.  So - a happy, Irish wreath for the door?  Yes, please.

I still have some old supplies left over from my teaching days, so I pulled out one of the shamrock templates I traced from a printable onto a manila folder eons ago to use for the wreath.  I'm 99% sure the last time it was used was for a St. Patrick's Day scavenger hunt for about twenty-five 7-year-olds around 15 years ago.  What?  I'm a crafting supplies hoarder.

The template was perfect for cutting out a bunch of shamrocks from different green patterns of scrapbook paper I had.  And yes, I still have little kid-sized scissors.  They tend to work better with smaller, intricate cuts than normal sized scissors.  And I'm a crafting supplies hoarder, remember?


I picked a few different patterns of paper in similar shades of green for the shamrocks.


For the wreath, I used a Styrofoam mold and wrapped green fabric all around it, securing it with pins and hot glue.  I just informally bunched up the fabric until it looked the way I wanted.  Sort of casual and scrunched.


I wanted to try and make the paper a little more weather friendly, so I coated both sides with Mod Podge to seal it before I glued them to the wreath.  We'll see whether that actually works!


I thought it could use something hanging in the middle, and I looked for a whimsical leprechaun that spoke to me, but no luck.  (See how I did that, there?)  I ended up just calling it a day after getting the shamrocks secured.  Maybe I'll revamp it later.


I hung the wreath using a piece of burlap in a simple, secure knot.


You've got to love the less than aesthetically appealing front doors they install in base housing, right?  I like to think the wreath helps a little bit in that department!


Aaaand one more pic for good measure:


So, Happy St. Patrick's Day!  Here's hoping my wreath doesn't get too destroyed by Kodiak's relentless rain. 

Ta-ta for now.